Imagine walking into a home that feels like a sweet wonderland during the holiday season. The whimsical touch of colorful treats and festive decor can instantly uplift the mood.

Creating a candyland theme in your home can be achieved without breaking the bank. You can craft beautiful candy-themed ornaments, garlands, and decorative pieces using everyday materials.
By incorporating these simple and budget-friendly ideas into your holiday decor, you can add a unique touch to your Christmas decorations and make your tree stand out.
This holiday season, get creative and make your home a festive haven that delights both children and adults.
Getting Started with Candy-Themed Christmas Decorations

As the holiday season approaches, transforming your space into a whimsical candyland can be a delightful way to celebrate Christmas. The candyland theme brings a unique charm to Christmas decorations, offering vibrant colors and nostalgic appeal that resonates with people of all ages.
Why Choose a Candyland Theme for Christmas
A candyland theme is not just visually appealing; it also creates a playful atmosphere that maintains the festive holiday spirit. The idea of a candy-themed Christmas decoration is to evoke childhood memories and create an inviting, joyful environment.

This theme is versatile and can be adapted for home displays, church decorations, or holiday party settings. The use of candy decor elements can add a touch of sweetness to your holiday celebrations, making it a great choice for those looking to create a memorable holiday experience.
- Candy canes as garlands or tree ornaments
- Gingerbread houses as centerpieces
- Colorful lollipops in decorative vases
- Candy-themed wreaths for doors
- Marshmallow snowmen for table displays
- Chocolate-covered treats in gift bags
The candyland theme is particularly appealing because it offers a wide range of creative possibilities. From candy canes to gingerbread houses, the elements that can be incorporated into your decor are endless. This theme allows you to be as creative as you want, making it a fun and engaging project for the whole family.
Planning Your DIY Candy Decoration Project
To efficiently plan your DIY candy decoration project, start by creating a materials list, setting a realistic budget, and establishing a timeline. Identify which candy-themed elements will work best in your specific space, whether it’s a full room transformation or accent pieces. It’s also important to balance traditional Christmas elements with candy-themed additions for a cohesive holiday look.
Prioritizing your candy decoration projects based on visibility, impact, and available resources will help you achieve the best results. Consider using dollar store supplies, items from Goodwill, and materials from craft stores to create your candyland theme without breaking the bank. With a little planning and creativity, you can create a beautiful and festive candy-themed Christmas decoration that will be enjoyed by all.
Essential Supplies for DIY Christmas Candy Decorations
Before diving into your DIY candy decoration project, it’s crucial to gather all the necessary supplies. Having the right materials on hand will make the process smoother and more enjoyable.
Dollar Store Finds
The dollar store is a treasure trove for candy-themed decoration supplies. You can find decorative crushed glass for “rock candy,” bamboo skewers to create the structure for rock candy, and silver metallic foil wrapping paper for oversized candy bars. These affordable finds can be repurposed in various creative ways to fit your Candyland theme.
Amazon-Recommended Products for Candy-Themed Christmas Decorations
- Foam Peppermint Candy Ornaments (Set of 6)
- Large Inflatable Candy Canes (Set of 2)
- Red and White Striped Ribbon (2.5 inches x 10 yards)
- Candy Land Pathway Markers (Set of 4)
- Faux Lollipop Decorations (Set of 3)
Craft Store Materials
Craft stores offer a variety of materials that can elevate your DIY candy decorations. Look for floral wire, wood beads, and large yarn needles to add intricate details to your creations. You can also find cellophane paper and paper lanterns to create colorful candy balls.
Household Items You Can Repurpose

Many household items can be creatively repurposed for candy decorations. Consider using cardboard tubes to create the base for candy bars or plastic containers to make candy-themed vases. You can also use paint to add a pop of color to your decorations. By repurposing everyday objects, you can save money and reduce waste while creating unique decor pieces.
By combining dollar store finds, craft store materials, and repurposed household items, you can create a comprehensive collection of supplies for your DIY candy decoration project. This thoughtful approach will help you stay within your budget while achieving a festive and inviting Candyland-themed Christmas decor.
Creating Festive Candy Balls
Transform your Christmas decorations with our guide on making candy balls that capture the essence of the Candyland theme. These delightful decorations are not only easy to make but also add a vibrant and playful touch to your holiday decor.
Large Candy Ball Decorations
Creating large candy balls is a simple yet effective way to make a statement with your holiday decorations. These oversized treats can be hung from the ceiling or placed on a mantel, instantly drawing attention.
Materials Needed
To make large candy balls, you will need paper lanterns, clear cellophane wrap, and rubber bands in festive colors. These materials are easily available at craft stores or online.
Step-by-Step Instructions
Start by wrapping the paper lanterns in clear cellophane, ensuring that the entire surface is covered. Use rubber bands to gather the ends of the cellophane, creating the signature twisted-end look of a candy. If needed, use scotch tape to secure the overlap of the cellophane wrap.

Mini Candy Ball Ornaments
Mini candy balls are perfect for decorating your Christmas tree or creating a festive centerpiece. They evoke memories of childhood candies like sixlets and add a nostalgic touch to your decor.
Materials Needed
For mini candy balls, you will need small colorful balls, clear cellophane, and rubber bands. These small balls can be found in craft stores or online.
Step-by-Step Instructions
Take a few of the small colorful balls and wrap them in clear cellophane. Gather the ends with rubber bands, and if necessary, secure the cellophane overlap with scotch tape. These mini ornaments can be hung on the tree or used as part of a table decor.
By following these simple steps, you can create a variety of candy decorations that fit your holiday theme. Whether you choose to make large statement pieces or delicate mini ornaments, your decor is sure to be a hit.
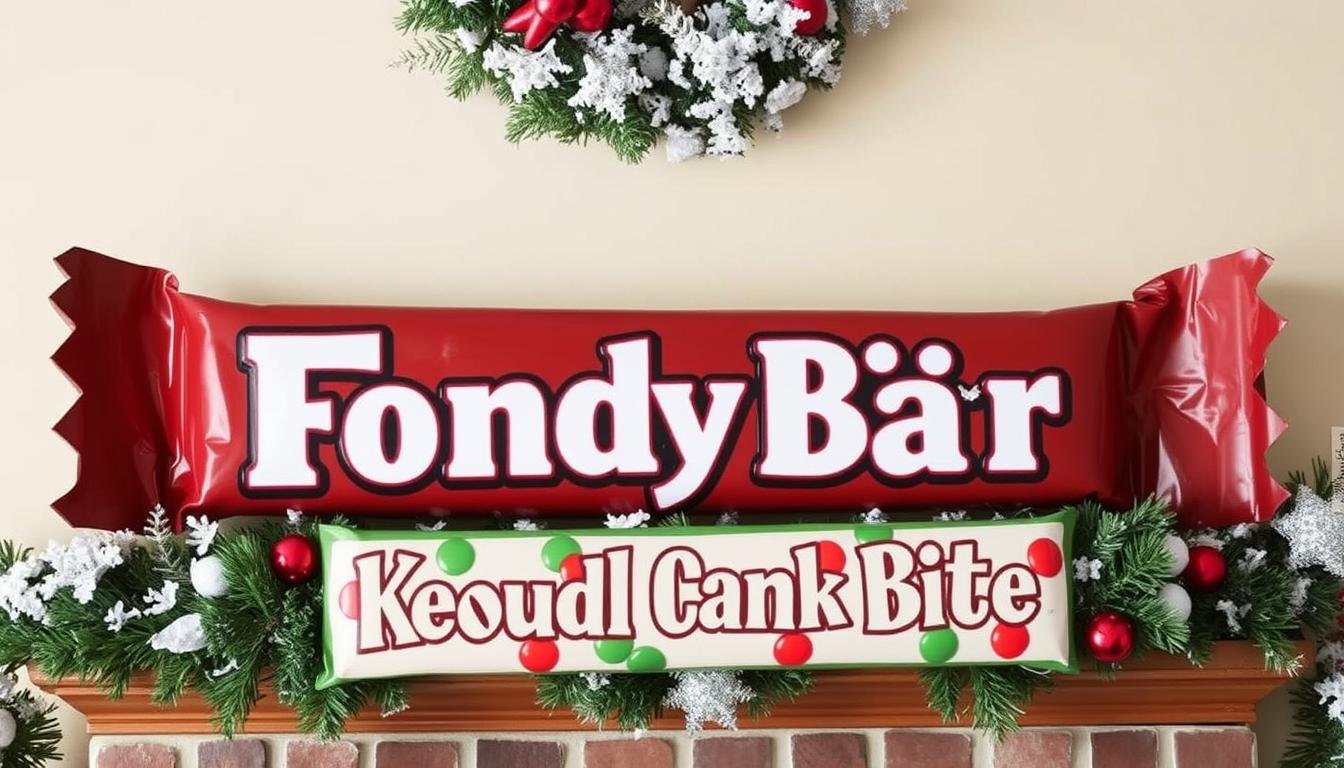
DIY Oversized Candy Bar Decorations
Transforming your holiday decor with oversized candy bars is a fun and creative project. These giant treats can add a playful and whimsical touch to your Christmas display, making it a memorable experience for your family and friends.
To start, you’ll need to gather the necessary materials for your giant candy bars. The base of these impressive decorations can be made from cardboard fabric bolts, which can often be obtained from fabric stores. These bolts provide a sturdy foundation for your candy bars.
Materials for Giant Candy Bars
To create your oversized candy bars, you’ll need a few simple materials. Start with cardboard fabric bolts as the base. You’ll also need metallic foil wrapping paper in silver or gold to give your candy bars a luxurious look. Additionally, you’ll require wrapping paper to cover the body of the candy bar and some tape to secure it. Finally, use a large stencil, paint, markers, or stickers to create a name for your candy bar.

Step-by-Step Construction Process
Begin by wrapping each end of the cardboard bolt with the metallic foil wrapping paper. This will give your candy bar a polished finish. Next, cut a piece of wrapping paper to fit around the body of the candy bar and secure it with tape. To add a personal touch, use a large stencil and paint or markers to create a name for your candy bar. You can also use stickers for this step.
The key to making your candy bars look realistic is in the wrapping. Make sure the paper is tightly secured and the edges are crisp. You can also add some texture to the wrapping paper to give it a more authentic look.
Creative Naming Ideas for Your Candy Bars
Getting creative with the names of your candy bars can add an extra layer of fun to your project. Consider names like Frosty’s Fruitcake Bar, Kris Kringle’s Cotton Candy Confection, or Jolly Jelly Bean Bite. These names not only sound appealing but also fit perfectly with the holiday theme.
By following these steps, you can create impressive oversized candy bar decorations that will be a hit at your holiday gathering. They can be displayed on a mantel, hung on a wall, or incorporated into a larger candy-themed vignette.
Handmade Popcorn and Candy Garland
By using spray foam and red ornaments, you can create a stunning and durable garland that captures the essence of a candyland Christmas.
To start, you’ll need to gather a few simple materials. The process begins with creating the “popcorn” elements that will be a crucial part of your garland.
Materials Needed for the Garland
To create your handmade popcorn and candy garland, you’ll need clear cellophane, straws, spray foam, red ornaments, twine, a large needle, and a hot glue gun.
Begin by taping a length of clear cellophane to the ground in a well-ventilated area. This will be the base for creating your “popcorn.”
Creating the “Popcorn” Elements
Place straws on the cellophane, leaving space between them. Then, squirt spray foam on top of the straws. Let it dry completely – ideally for two days. Once dry, you’ll have the “popcorn” pieces.
If the straw isn’t stuck to the back of the foam “popcorn,” use hot glue to attach it. Trim the straws evenly with the ends of your “popcorn.”

Adding Candy Elements to Your Garland
Transform red ornaments into “candy” by creating a hole opposite the top using a hot glue gun. Remove the hanger from the ornament.
Repeat this process for all your ornaments to have a uniform look.
Assembly and Display Tips
Using twine and a large needle, string a “popcorn” piece through the straw, followed by a “candy” through the hole you created.
Continue this pattern until you achieve your desired garland length. You can display your garland on the Christmas tree, mantel, or doorway, adding a whimsical touch to your holiday decor.
Customize the density and length of your garland to fit different areas of your home, making it a versatile decoration for the season.
Rock Candy Ornaments for Your Christmas Tree
Add a touch of elegance to your Christmas tree with rock candy ornaments that sparkle and shine. These beautiful decorations are not only visually striking but also relatively easy to create using simple materials like wooden skewers, beads, and decorative crushed glass.

Materials for Rock Candy Ornaments
To start making your rock candy ornaments, you’ll need a few basic supplies. These include wooden skewers, wooden beads, decorative crushed glass in various colors, and a hot glue gun. The crushed glass is available in several different colors, allowing you to customize your ornaments to fit your desired theme or color scheme.
Step-by-Step Creation Process
Begin by using hot glue to attach a wooden bead onto the pointed end of your skewer. While this sets, pour your crushed glass onto a sheet of parchment paper. Next, use the hot glue gun to run thick lines of hot glue onto your skewer and roll it in the glass. Repeat this process in layers until your skewer is fully covered, creating the crystalline rock candy appearance.
“The key to achieving the perfect rock candy look is to apply the hot glue in a way that creates a textured surface for the crushed glass to adhere to.” By doing so, you’ll end up with ornaments that catch and reflect light beautifully.
Variations and Color Options
One of the best aspects of making rock candy ornaments is the flexibility to experiment with different colors and designs. You can choose traditional holiday hues, go for a monochromatic scheme, or create rainbow varieties to add a pop of color to your Christmas tree. The choice of color is entirely up to you and can be tailored to fit your overall holiday decor.
By following these steps and exploring different color options, you can create a set of unique rock candy ornaments that will add a touch of magic to your Christmas tree display.
DIY Candy Sprays and Tree Picks
Transform your Christmas tree into a candy wonderland with DIY candy sprays and tree picks that are both budget-friendly and adorable. Creating your own candy decorations is a fun and creative way to add a personal touch to your holiday decor.
Budget-Friendly Materials
To start, you’ll need a few simple materials, including floral wire, bingo chips, hot glue, and parchment paper. These items are easily found at dollar stores or craft stores, making this project very affordable. By repurposing bingo chips as peppermint candy pieces, you can create a convincing and charming candy decoration without breaking the bank.
Creating Peppermint Candy Sprays
The process of creating peppermint candy sprays involves transforming bingo chips into candy pieces using hot glue and floral wire. Begin by spacing out eight bingo chips on parchment paper, using markings as a guide. Apply a dot of hot glue to each chip, then carefully place a piece of floral wire on top. Immediately cover with another bingo chip to create a “candy sandwich.” This technique allows you to create multiple candy sprays quickly and easily.

Incorporating Candy Sprays into Your Tree
To incorporate your candy sprays into your Christmas tree, simply twist three or more together at the base and insert them deep into the tree branches. This creates a fuller, more professional-looking tree pick that adds visual interest to your tree. You can cluster your candy sprays in strategic locations or distribute them evenly throughout the tree for a balanced look. By coordinating your handmade candy sprays with other tree decorations, you can achieve a cohesive candyland Christmas theme that delights both kids and adults.
Some key benefits of making your own DIY candy sprays and tree picks include:
- Creating a unique and personalized holiday decor
- Saving money by using affordable materials
- Having fun and being creative with a DIY project
- Being able to customize the look and feel to match your candyland Christmas theme
By following these simple steps and using your creativity, you can create beautiful and charming DIY candy sprays and tree picks that will make your Christmas tree stand out.
Setting Up a Candyland Christmas Tree
With a few simple steps, you can turn your Christmas tree into a colorful Candyland-themed masterpiece. This festive tree will be the centerpiece of your holiday decorations, bringing joy and sweetness to your home.
Choosing the Right Base and Lights
The foundation of your Candyland Christmas tree is crucial. Start by selecting a sturdy tree base that complements your candy-themed decorations. For lighting, opt for a scheme that enhances your candy decorations without overpowering them. Soft, warm white lights can create a cozy ambiance, while colorful LED lights can add a playful touch.
- Consider the color scheme of your candy decorations when choosing the lights.
- Ensure the lights are evenly distributed to avoid any dark spots on the tree.
- Use a dimmer to adjust the brightness according to your preference.
Arranging Your DIY Candy Decorations
Arranging your DIY candy decorations is an art that requires balance and creativity. Start by distributing your ornaments and decorations in a way that creates visual paths for the eye to follow. Mix large and small decorations to add depth and dimension to your tree. Place some elements closer to the trunk and others at the branch tips to create a layered look.

To achieve a cohesive look, maintain a consistent color story throughout your tree. Incorporate your handmade candy decorations alongside store-bought ornaments to create a balanced and professional appearance.
Creating a Candy-Themed Tree Topper
A tree topper is the crowning glory of your Candyland Christmas tree. Create a custom topper using materials like green tulle and a wooden candy cane lollipop ornament. To secure the topper, adhere a large lollipop stick to the back of the ornament using hot glue, then insert it into the top of the Christmas tree.
By following these steps, you can create a show-stopping Candyland Christmas tree that serves as the centerpiece of your holiday decorations.
Additional Candy-Themed Christmas Decoration Ideas
Take your candyland Christmas theme to the next level with these innovative decoration ideas. While you’ve already created a stunning candy-themed Christmas tree, there are many more ways to incorporate your sweet treats into your holiday decor.
Transforming Flower Pots into Gumball Machines
Create charming gumball machines using ordinary flower pots, red spray paint, clear plastic bowls, and colorful beads. Start by painting the flower pots with red spray paint to give them a festive look. Once dry, fill the pots with colorful beads or small candies, and top with a clear plastic bowl to create the gumball machine effect.
Creating a Candy-Themed Photo Backdrop
Design an impressive candy-themed photo backdrop using green and red tablecloths, green mesh plastic fencing, and your handmade candy decorations. Attach your candy creations to the mesh fencing using wire, creating a visually appealing and interactive backdrop for holiday parties or family photos.

These additional decoration ideas not only enhance your candyland theme but also serve as interactive features for your holiday gatherings. Consider adding candy cane pathway markers, peppermint plate chargers, or lollipop bouquet centerpieces to create a cohesive and festive atmosphere.
Troubleshooting Common Issues with Candy Decorations
To ensure your Candyland Christmas decorations remain beautiful throughout the holiday season, it’s crucial to know how to fix common issues that may arise. When creating your DIY candy decorations, you may encounter problems such as loose or falling decorations, sticky spray foam, or issues with cellophane wrapping.
Fixing Loose or Falling Decorations
One common issue with candy decorations is that they can become loose or fall off the display. To fix this, you can use hot glue to reattach the decorations. Alternatively, you can use wire or fishing line to reinforce the decorations and keep them in place. For example, if you’re creating a candy garland, you can use wire to attach the candy pieces to the garland string.

Dealing with Sticky Spray Foam
When working with spray foam, it’s essential to be aware of its sticky and messy nature. To avoid issues, make sure to let the foam dry completely before handling it. If the foam is still sticky, you can try letting it dry for a longer time. Once dry, you can use glue to attach additional elements, such as straws to create “popcorn” for your garland. Remember to use scotch tape to secure overlapping cellophane wrap if needed.
By following these troubleshooting tips, you can ensure that your Candyland Christmas decor remains intact and beautiful throughout the holiday season.
Conclusion: Enjoying Your DIY Christmas Candy Decorations
Now that your Candyland Christmas decorations are in place, you can relish the fun and satisfaction of having created something truly unique. Your DIY candy decorations bring a personal touch to your holiday home, making it a special part of your Christmas celebration.
These projects can become cherished family traditions, creating lasting memories and potentially heirloom decorations. Consider documenting your creations through photographs to share on social media or preserve for future reference.
To ensure your handmade candy decorations remain beautiful for years to come, proper storage is key. You can also draw inspiration from your candy-themed decor for future DIY projects or expand upon it in subsequent holiday seasons.
Sharing your creations with others can add to the joy, whether through holiday parties, decoration exchanges, or gifting handmade ornaments. Your Candyland Christmas decor is sure to spread cheer and become a highlight of your holiday season.
Disclaimer: This post may contain affiliate links. As an Amazon Associate, we earn from qualifying purchases at no extra cost to you. AI tools may assist with some content. All opinions are our own.